Powerful Photoshop Layers pg 5: Production Graphics with Wendy Peck at webreference.com
 |
Powerful Photoshop Layers: Layer Effects Settings | |
|
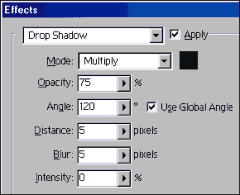
All layer effects are controlled through the Effects window. You add many effects at one time.
|
The layers effect window offers a menu for each effect available, and they are all similar. To activate the effects menu, right click (Command click) on the layer you wish to add the effect to, and choose Effects. You can also choose Layer>Effects and then the effect you wish to add from the main menu. The Effects window will open. You can choose the effect you wish to add from the drop-down menu at the top of the window. The Apply option must be active for that effect to be applied to your layer. You can add more than one effect on the same visit to the Effects window. The Mode drop-down box offers the same options that are available throughout Photoshop usually the default setting is the best for this setting, but experiment with other settings for unique effects. You can also change the color that is used to create each effect by simply clicking on the color well and choosing another color. I rarely use a colored shadow (though I have seen them used effectively), but I quite often use a shade of gray to reach the effect I desire. The opacity is the one setting I always adjust on drop shadows. I find that a setting between 35% and 60% usually allows for a shadow that shows well, yet does not overpower the object. |
|
|
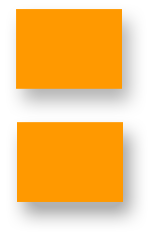
The top image uses the default global angle. The lower image shadow was adjusted using by changing the global angle. Since all layers have Use Global Angle activated, all layers will change to the new setting (see below).
|
The Global angle is a terrific setting. Shadows and other dimensional effects are intended to represent the effect of light on an object. Obviously, the light source angle is constant in a static image. The global angle setting provides a light direction that carries across the entire image. The sample at the left is constructed of three layers. In the top sample, the default setting of 120° is used. One click changed the angle through the image to -48°. To adjust the angle, simply click on the angle flyout and click where you would like the new light source to be, or click and drag to your desired setting. If you know the angle you wish to use, you can also type the value. With the Use Global Angle option checked, this adjustment will change the angle across the entire image. Occasionally, you may wish to have the a unique angle on one layer (be careful with this though). Uncheck the Use Global Angle option, and you can change the setting for the active layer without affecting other layers. |
|
|
Intensity is increased in the lower sample, with all other values remaining the same. |
The distance, blur and intensity settings create the effect that the object is rising above the page. A low distance value will make the object appear to be quite close to the page, while a high setting provides the illusion that the object is floating well above the page. A closer setting is often better for text. The blur setting provides control over the amount of feathering in the shadow edges. I often find that I reduce the distance and increase the feathering in drop shadows. Finally, intensity can be a lifesaver. By increasing the intensity value you can keep the shadow soft and realistic, yet make the shadow stand out. The sample at the left shows the difference between an intensity setting of 0 and 25, with all other settings the same. |
|
|
Default values (top image) are often too harsh. The lower sample here has had the distance and blur reduced and the shadow color changed to gray from black. |
Bevel and Emboss Experiment with settings by checking the preview option on the Effects window. You can watch the changes as you apply new values. It takes a little extra time in the beginning, but you will soon find that your instincts will lead you quickly to the correct settings. Finally, carry on to the next page to learn some great time saving tips for working with effects. Not only will your work be faster, but you will apply effects much more consistently across your image. |
|
|
|
Powerful Photoshop Layers Tutorial IndexPowerful Photoshop Layers Start |
URL: https://www.webreference.com/graphics/
Created: August 18, 2000
Revised: August 18, 2000


 Find a programming school near you