In today's social networking world, relying on past methods of contact is pretty much a lost cause. More people are relying on Facebook and Twitter to stay informed. While you can use a Facebook event to let a group of acquaintances -- say, alumni from your high school graduating class -- register for an event, it's not nearly as flexible as a customized application. Developing a customized Web application that allows for registration and then sends an email confirmation is relatively simple using ASP.NET.
When planning to develop this type of application, one requirement is apparent: a basic form that will collect first and last name, email address, and a few other options to confirm whether the alumni are attending dinner and how much it will cost. When they submit the information, you can store that information in a database, as well as send them an email confirming those details.
If you would like to learn how to build an application like this, read on. You'll need Visual Studio 2008 or Visual Web Developer and SQL Server 2005 or 2008.
Create the Database
- Start -> Programs -> SQL Server <ver> -> SQL Server Management Studio, where <ver> is your version of SQL Server.
- Connect to your local database server.
- Create your database by right clicking on databases and selecting New database as shown below:
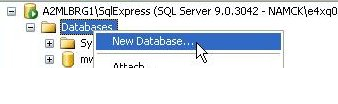
- Give your database a name of mwd and click OK.
Create the Main Table
To create your tables, follow these steps:
- Click the plus (+) sign next to your database as shown below:
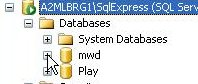
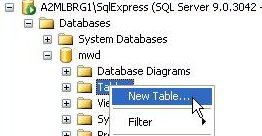
- Right click on Tables, and select "New Table" as shown below:
Create your table, registration, first. You need the following columns:
- Primary key
- Data type: int
- Not null
- Data type: varchar(50)
- Null
- Data type: varchar(50)
- Null
- Data type: varchar(50)
- Null
- Data type: varchar(100)
- Null
- Data type: bit
- Null
- Data type: varchar(2)
- Null
- Data type: datetime
- Null
- Data type: varchar(100)
- Null
- Data type: char(1)
- Null
- Data type: money
- Null
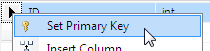
Before continuing, be sure to set the primary key by right clicking the column (ID) and choosing primary key as shown below:
While you're at it, set the seed on this column as well by setting Identity Specification to Yes as shown below:

Minimize SQL Server Management Studio. You're done with it for the time being.
Create the Project
Open Visual Studio from the desktop as follows: Start -> Programs -> Microsoft Visual Studio. From the main menu, create a new project by following these steps:
- File -> New -> Project
- In the New Project window, under the Visual C# tree, choose Web and then ASP.NET Web Application.
- In the name text box, name your project "Registration."
- Leave "Create a directory for solution" checked.
- Click OK.
After the project is created, you'll have one ASPX file and a web.config.
From the solution explorer, double click web.config and look for <connectionStrings>. Replace the default markup with the following:
Simply replace the value inside the double quotes for connection string with your settings. When completed, save your file.
From the solution explorer, double click default.aspx and remove everything between the opening and closing <form> tags. Replace with the following markup:
As you can see from the code above, you create two placeholder controls: your initial placeholder, which contains your initial form contents, and your second, which contains your success message.
Your initial placeholder contains two additional placeholders: phAttending and phWhyNotAttending. The first one will show if the visitor selects the yes button on your radio button list. The other one will show if the user select the no button. The radio button list has an attribute AutoPostBack set to true, which will take care of programmatically showing or hiding the appropriate placeholders.
Your buttons have submit and reset options. Your submit button has an attribute of OnClick set to an appropriate method, which is a server-side event. Your reset button has an attribute of OnClientClick set to an appropriate method, which is a client-side event.
Before you can run the project, you need to add the submit event handler to your code behind file. From the solution explorer, click the plus sign (+) next to default.aspx and then double-click default.aspx.cs.
Write the submit event handler as shown below after the page load event:
Save your file(s).
Writing the Toggle Functionality
Before you can see whether your form functions as intended, you need to write a simple toggle (show or hide) for your placeholders, reflecting whether your alumni are attending or not. Right after your submit event handler, let's write the following code:
As you can see from the code above, you store the value the visitor selects in a string variable named attending. Then you use a switch statement on the variable to implement the following:
- If yes is selected, show attending placeholder and hide not attending
- If no is selected, show not attending and hide attending
- If neither is selected, show the attending and hide not attending
A switch statement is different from if/else in terms of how it's evaluated. With the former, as soon as the switch hits the pertinent line of code, it executes what is needed and then kicks out. With the latter, regardless of what line of code it hits, it always hits the else, even if it kicks out. As a result, switch statements often lead to more efficient and readable code in some situations.
In your page load event, add the following call to this method:
As you can see from the code above, you simply call the method on page load. Save your file(s) and you can now preview the page and demo the functionality. Selecting either radio button should show or hide the appropriate placeholder.
Creating and Writing Registration Class
You could very easily write the insert functionality directly inside your code behind file. However, if you ever needed to provide additional features such as update or delete functionality, writing this in the code behind file wouldn't lend itself very well to reusability. An object-oriented approach would. So, we'll create a simple class that could be reused later if needed. Follow these steps to create the registration class:
- From the solution explorer, right click and select Add : New Item.
- In the add new item window, select class.
- In the name text field, type "Registration" and then click Add.
In order to work with a database, you need to import some namespaces in the class. At the top of the class, add the following code:
As you can see, you added three. The first allows you to work with stored procedures in ADO.NET, the second allows you to reference a connection key from your configuration file, and the last allows you to connect to SQL Server.
Creating Your Declarations
Let's first add class-level variables so that you can get or set your data. Add the following code as shown:
As you can see from the code above, you added a region that holds your class-level variables. These variables match your columns from the database table.
 Find a programming school near you