Creating a custom e-newsletter with common tools such as HTML, CSS, ASP.NET, and SQL Server is great, but it leaves out a key piece: allowing users to enter their information and decide whether they want to receive these newsletters. Using the steps I laid out in my previous two articles on sending an e-newsletter with ASP.NET, you would have to manually enter all recipients that wanted to receive these newsletters, which is tedious and painful.
A better alternative is to create a user interface that collects basic user information such as first and last names and e-mail addresses, and presents a check box that lets users decide whether they want to sign up for periodic newsletters. You can also add personalization, formatting the introduction to reads as if the newsletter is intended for a specific individual, even though you send it to hundreds.
Furthermore, you can then provide a link at the bottom of the page that would allow the recipient to unsubscribe at any time, rather than requiring them to e-mail you. Using this approach, you save on data-entry time and allow the user to control whether they receive periodic e-mails without the hassle of maintenance.
Modify Your Database Table
In SQL Management Studio, make sure you connect to your existing database server. When connected, expand the e-mail recipients database, and then expand the table folder icon, which will show the e-mail recipients table. Right click on the e-mail recipients table and select design, which will allow you to modify this table. You currently have three fields:
- ID
- DateTime
Now add three more, using first name as your example. Right click on the gray rectangle box next to e-mail and select insert column as shown below:
Use the following for the column:
- FName
- Varchar(50), null
Using the same method, add the two other columns:
- LName
- Varchar(50), null
- Subscribe
- Bit, null
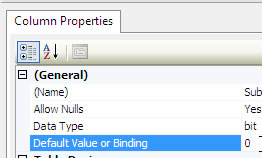
Before saving these additions, left click the gray rectangle box next to subscribe, and in the properties window, set the default value to 0 (false) as shown below:
Set the Default Value to 0 (false)
By default, bit fields in SQL are Boolean, meaning they're either yes or no. The reason for setting this by default to 0 (false) is you don't want to send the e-mail to the recipient unless they specifically check the box in your user form.
Save your table, close the table by right clicking the tab that displays the table name, and then minimize SQL Management Studio.
Note: When saving your table, if you receive an error saying SQL Management Studio has prevented the ability to save, do the following from the main menu:
- Tools>Options
- Left click Designers in the options pane
- On the right side, uncheck Prevent saving changes that require table re-creation
Work with the Send E-mail Solution
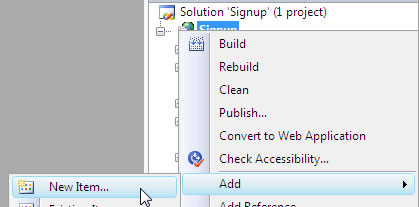
In your send e-mail solution, right click on the project and select "add new item" as shown below:
In the "add new item" window, leave web form selected and in the file name, type "signup.aspx", and then click add. Next, right click on the solution, choose "add new item", and then select style sheet. In the file name, type "style.css". Double click signup.aspx to open it and remove everything inside the opening and closing <form> tag.
Change the Title Tag
Inside the opening and closing <title> tags, add the following:
Add Reference to the Style Sheet
Even though you haven't written any CSS, add the reference to it as shown below:
Create Placeholder Controls
Inside your opening <form> tag, create a placeholder control that will contain your form for collecting user information as shown below:
As you can see from the code above, you create your server-side control, aptly named Placeholder, with the following properties:
- ID=formPH
- Gives your control a unique name and allows you to reference it from the code-behind file
- Runat=server
- This control will be run by the server first, and then the HTML output will be sent to the browser
- Visible=true
- Sets the visibility of your form contents to show
Now, add one more Placeholder below your original Placeholder as shown below:
This Placeholder will be shown instead of your original one when the user submits his or her information. Think of it as a confirmation that everything was successful.
Your form up to this point should look like this:'p>
Create the Form
You could create the form inside a table, but this form is relatively easy and so is the CSS to do it. Start by adding the following inside your Placeholder control:
I've omitted the second Placeholder for brevity. As you can see from the code above, you have created a container DIV with an ID of formLayout that will hold your form contents. Now, create the rest of the form as shown below:
I've created labels and server-side controls for the information you need. To achieve a tabular look, add the following CSS:
As you can see, you give your container DIV the following property values:
- width of 400 pixels
- top and bottom margin of 20 pixels
- left and right of auto, which centers the form in your browser
- padding of 10 pixels
Continue by adding the following:
In the code above, you float each label left, set padding to 6 pixels, set margin to 4 pixels, set font size to .8em, and set width to 200 pixels. Setting width to 200 pixels will force each of the corresponding text boxes to line up in unison. Save both your files.
Next, touch up the form a bit more by adding the following CSS:
In the code above, you set a top margin on your text boxes, create a class named clear and set it to clear left floats (your labels), set your legend to a slightly larger font size and color of black, and lastly, set your success message to an appropriate font size and center the text in the browser. After saving your CSS, add the following to your ASPX page:
Forcing each new label to clear the float above it emulates table rows visually. Save both files. Before you can preview the results, you need to open the code behind file for your ASPX page and add the following:
Because you had an onclick attribute associated to your button, you have to add the corresponding server-side event handler. Otherwise, you will receive a run-time error when previewing. With this completed, save your files and preview the results.
Validating Your Form
For your purposes, you would like to ensure you get a first and a last name, along with an e-mail address. Validation typically takes place at two levels: (1) the client and (2) the server side. On the client side, you validate with JavaScript, because it provides instant feedback and incurs very little overhead. However, JavaScript validation can easily be circumvented because all modern browsers allow you to disable JavaScript, which leaves your form vulnerable. Server-side validation accounts for this. With server-side validation, you perform identical validation checks but on the server when you process the request to submit the information. The only tradeoff is the overhead you incur, which is usually negligible.
Before ASP.NET, the only option you had to perform client-side validation was creating a separate JavaScript file to do this in ASP. However, with ASP.NET, you can perform client-side validation with validation controls and then in your code behind file you can verify the same checks but use server-side validation. ASP.NET provides many different controls that make your life easier. It should be noted that you can still use other JavaScript tools such as JQuery but generally speaking, there's no need to in ASP.NET.
Validation can get very specific, but for your purposes, all you want to ensure is that the fields are not empty. Fortunately, the validation controls provided by the framework will work just fine.
Create the Required Field Validator
In your ASPX file, right below your first text box control, add the following control:
As you can see from the code above, you have created a new control called required field validator with the following properties:
- ID=rfvName
- Gives your control a unique name file
- Runat=server
- Tells you this control is processed by the server, with HTML output sent back to the browser
- ControlToValidate=fNameTB
- Tells you to validate your first name text box
- ErrorMessage
- If a visitor leaves first name empty and presses submit, the error message shows in red
It should be noted that error messages will appear where the validation control resides. Add the other two as shown below in your complete form:
Note that you may want to use a regular expression on your e-mail address, just to ensure you have a valid pattern, but that's beyond the scope of this article. Check out regexlib.com for multiple examples. Save your file, preview the results, leave a couple of fields empty, and click subscribe. You should see error messages in red. If you want to reduce their font sizes, add the following to your style sheet:
Save your style sheet and ASPX file.
 Find a programming school near you
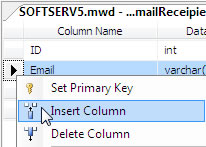