In my previous article, "Sending an HTML and Plain Text E-newsletter with ASP.NET," I discussed the steps involved in creating an ASP.NET page capable of sending a HTML or plain text email to a specified recipient. Furthermore, I demonstrated the Ajax toolset for preventing an email from being sent to the specified recipient more than once.
Now, it would be nice to re-engineer this page to send an email to multiple recipients when they click the submit button. In order to do this, you'll need a repository such as a database to store recipients' email addresses, and then you can use SQL queries to determine when to send the emails.
Knowing these specifications, you need to do the following:
- Create a database, preferably SQL Server (version doesn't matter)
- Create a table with three fields
- Re-engineer your web form to connect to the database table
- Use SQL to query email recipients and then email them one by one
Open Microsoft SQL Studio
In order to interact with your database, you need to have Microsoft's SQL Server Management Studio installed. If you don't have the professional version, you can use the free developer edition.
When you have the program installed, open the program from the desktop as follows:
Left-click Start>Programs>Microsoft SQL Server ver>SQL Server Management Studio
Where ver is the version you're using.
Connect to the Database Server
With SQL Server Management Studio open, you will be prompted with a database connection dialog screen (this one is displaying the default settings for my remote database server):
Connect-to-Server Dialog in SQL Server Management Studio
The following fields are the ones you need to change:
- Server name: The name of your database server (Can be a qualified name or an IP address)
- Authentication: Two types, SQL Server authentication or Windows authentication (For the purposes of this article, it will be the former.)
- Login: Your user name
- Password: The password associated with the above user name
When all these fields are filled in, left-click the Connect button. When you are done, in the left-hand pane of SQL Server Management Studio, you should see your database server listed as shown below:
A Database Server Listed in SQL Server Management Studio
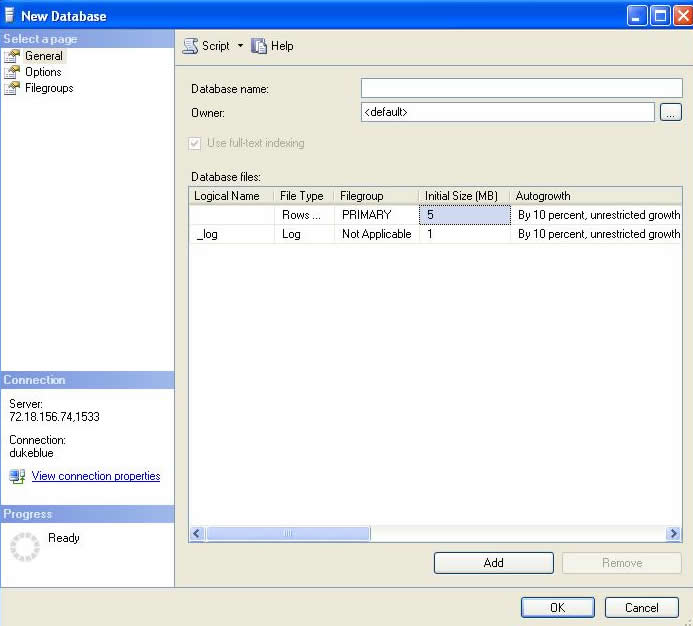
Create the Database
When you have connected to your database server, you can create your database by following these steps:
- Right-click databases
- In the menu that shows, select New database.
The new database window shows:
At the top of the window, there's one text field: database name. Simply type EmailRecipientsDB and left-click OK.
The newly created database should show in the tree under databases.
Create the Table
Now you can create a table:- Left-click on the database.
- Right-click on a table, which shows a context menu.
- Select New Table, which shows the table window:
In this table, add the following columns, along with their data types, as shown below:
- ID
- Primary key
- Data type: int
- Allow Nulls: No
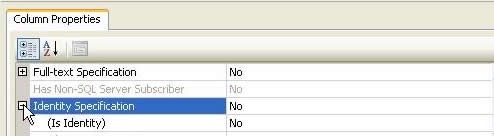
- Identity: Yes
To set the primary key, right-click on the ID column and left-click to select primary key. To set the identity, you must be inside the column window. From there, look in the column properties window that displays and select the plus (+) node next to Identity Specification as shown below:
Select Identity Specification Node
Simply click inside the second drop down list (Is Identity) and a drop menu icon will appear. Left-click and select Yes as shown below:
From this point forward, each new record that is inserted into your table will have an automatic seed set, ensuring no two records are the same.
- Email
- Data type: varchar
- Field length: 50
- Allow nulls: yes
- DateTime
- Data type: datetime
- Allow nulls: yes
When you have created the columns, enter a couple of email addresses and leave the date/time column null.
Open the Project Solution
If you have not opened Visual Studio, open it now from the desktop as follows:
left-click Start>Programs>Microsoft Visual Studio ver>Microsoft Visual Studio ver
Where ver corresponds to your version, 2005 or 2008; you may also use Visual Web Developer Express.
The application will launch with a default start page. Open the project solution I created last time by following these steps:
- From the main menu, select File>Open Project/Solution.
- Navigate to the solution file, SendEmail.sln.
- Left-click to select OK.
Open Web.config
From the project solution, locate your web.config file in the solution explorer and double click the file to open it. Inside your configuration file, you should see the following near the top:
You are concerned with the middle tag, connection strings. Modify the tag with the following code:
As you can see from the code above, I added a connection key (mwdConnectionString) to the connection string parent tag. You can change the connection if you want. The connection string is currently set to the following parameters:
- Data source: Set to your database server (qualified name or IP address)
- Initial catalog: Set to the name of your database name
- User ID: Set to your user name
- Password: Set to your password
From this point forward, you only need to reference the name of your key from any ASPX page that needs to connect to this database. This is handy because a normal web application might have multiple ASPX pages that need to work with this database. In my ASPX pages, I simply reference the mwdConnectionString key. This also alleviates maintenance headaches if your database server changes. Before closing the file, make sure you save your changes.
Manipulate the sendemailsstart.aspx File
Download the source code download and extract the sendemailsstart.aspx file. In this file, replace this:
With this:
You simply added a server-side button control with an onclick event.
Open sendemailsstart.aspx.cs and Add Name Spaces
At the top of the c-sharp code-behind file, add the following using statements:
As you can see from the example above, by importing the first namespace, I can reference your configuration file, while the second namespace allows us to connect to a SQL Server database.
The HTML and plain text of the email has already been added from the original article so I can focus on writing your enhancement.
 Find a programming school near you
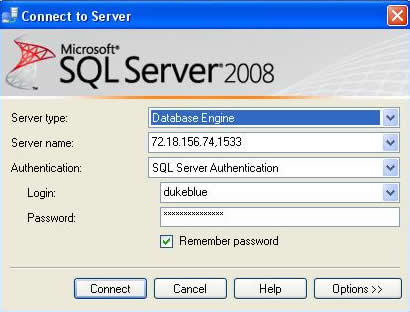
.jpg)