3D Animation Workshop: Lesson 20: Metal and Mirrors | 3
|
|
Lesson 20 - Metal and Mirrors - Part 3
True reflectivity, as opposed to specularity, is the reflection of the colors of the surfaces of other objects in the scene. The extreme example, of course, is a mirror. The better the mirror, the less it's own surface characteristic are visible, and mirrors are used in interior design to fool the visitor with the illusion of depth and space.
With reflectivity we first encounter the important concept of ray tracing. We will develop this concept quite a bit as we go on, but for the present it is enough to understand that ray tracing is a rendering method that accounts for the interaction of light between different objects in the scene. Thus ray tracing is used define shadows that objects cast on each other, to draw reflections that objects project on each other, and to account for the diffraction of light from an object seen through a transparent or translucent object.
We had a glancing look at ray-traced reflections back in Lesson 17, when we made the counter top in our scene reflective. Where a mirror-like effect on a flat surface is required, true ray-traced reflections must be used. But the ray tracing of reflections is extremely computationally intensive and produces long render times. This is not such an important issue with the spoon in our scene because the surface area is small. But a curved metallic surface like the spoon distorts reflections so greatly that true ray-traced reflections may not be necessary and may not even be satisfactory.
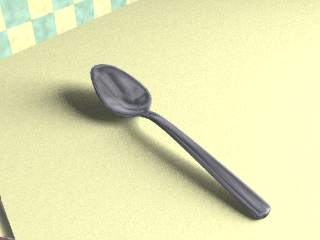
Here is the spoon with ray-traced reflections.

Ray tracing results can differ markedly between rendering engines, but this result in Lightwave is curious. It is satisfying in that the reflection patterns follow and reinforce surface curvature of the spoon. But it is also a bit too bold, with too much contrast between the darker and lighter areas and not enough gradation. If the object was small enough in the scene, this might be an asset, but here it is not convincing.
Compare it with our original spoon and examine the difference.
The original spoon used an image map with a random fractal pattern for the reflections, rather than ray tracing the reflections off the surfaces in the scene. Why would we want to do this? One reason, as here, is where the nature of the object is such that the viewer would not really expect to recognize the reflections from the surrounding scene, but will be visually satisfied with a pattern across the surface. Using the map decreases our rendering time and gives us a pleasing result.
Another and often more important reason for reflecting a map is to fix a particular reflection to a surface. For example, we may build a scene in which there are glass windows fronting out on the street. The windows should carry a pale reflection of a street scene outside. We don't necessarily want to go to the trouble of modeling all the objects on the street just so they can create a reflection that is mostly an atmospheric effect. A photograph of a street screen used as a reflection image will do the job perfectly. And even if we do intend to build reflected objects, they may not serve our reflection purposes when the scene is composed. If we want to be sure that a certain object is reflected in a window, it may be better to render a image of it and use that specific image for reflection, rather than trust to ray tracing reflections in the scene. In that way, the reflection can be precisely placed on the reflected surface. This is not a relevant consideration with our spoon, but can be very important in other instances.
Ray-traced reflections and the use of a reflected image need not be mutually exclusive, and perhaps the following combination of both techniques produces the best result.

The ray tracing contributes the sense of curvature we noted above, but the whole effect is softened by the random pattern from the map. And, of course, the map adds the illusion of beveling on the handle. It's a question of personal taste whether the little added realism here is an esthetic improvement.
Next time, we will finish this project with a look at the hardest part--the glass beaker.| To Return to Parts 1 and 2, Use Arrow Buttons |
|
Created: September 9, 1997
Revised: September 9, 1997
URL: https://webreference.com/3d/lesson20/part3.html
 Find a programming school near you