Welcome to Part 2 of the How to Create an Ajax Autocomplete Text Field series. In part one, we downloaded and configured some free development tools to help us manage the technologies that make up the Autocomplete text field. This week, we'll construct the The Fund Java class, which will act as a container for all the fund's properties. On the server, we'll store a collection of funds to be searched. Matching ones will be converted to a JSON array and returned to the browser for displaying in our Autocomplete list. We'll start with the Fund class because it has the least external dependencies and is a great way to show off Eclipse's automatic code generation.

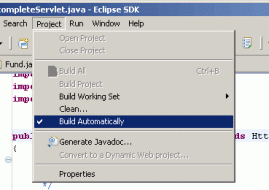
Fig. 1: Build Automatically
Some Useful Code Development Settings
Eclipse offers a couple of nifty features to make it easier to work with the Java files.
Another relevant feature is the ability to set code formatting standards. All organizations have slightly different ways of formatting their code, so it's nice to be able to generate Java code that matches your preferred format. The facilities to do that in Eclipse are found under "Java: Code Style: Formatter" in the main "Preferences" dialog, under "Windows: Preferences..." on the main menu (See Figure 2).
I encourage you to create your own profile rather than change the existing ones. To create a new profile, click on the "New..." button. In the "New Profile" dialog, enter the name of your profile in the "Profile name" field. Mine is "RobG". You can choose from any preexisting profiles to use as the basis for your new one. The "Eclipse [built-in]" one is what is used by default. Make sure the "Open the edit dialog now" checkbox is checked so that you can make your changes right away (See Figure 3).
After you hit the "OK" button you'll be greeted by the massive "Profile" dialog! It allows you to modify a multitude of coding styles. For me, the most important are the brace positions. I like to have all opening and closing braces that span more than one line to be aligned vertically. To accomplish this, select, the "Braces" tab and chose the "Next line" option from each dropdown except the last one (See Figure 4).
Click the "OK" button on this dialog and the "Preferences"one to accept the changes and set your new profile as the active one.
Set up the Package Structure

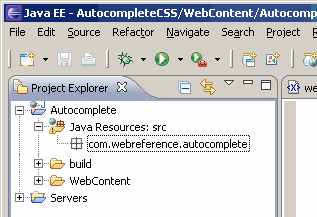
Fig. 7: com.webreference.autocomplete package
As you may already be aware, in Java it's commonplace to organize project files in subdirectories called packages. For instance, in the Canadian government, we use "ca.gc.<branch>" as the base for all projects. It's also customary to use the company's domain name, such as "com.widgets.". In our project, we are using JSON utility classes which reside in the "org.json" package. For the purpose of this exercise, we'll house our Autocomplete text field classes in a package called "com.webreference.autocomplete".
To create the packages, right click on the "Java Resources" branch in the "Project Explorer" pane. That brings up a popup menu of one item: "New." Hover the mouse pointer over that to bring up the second popup, which contains the "Package" item (See Figure 5).
Click on "Package" to bring up the "New Java Package" dialog (See Figure 6).
Type the entire "com.webreference.autocomplete" package name in the "Name" textbox and click on "Finish" to create the package structure (Figure 7).


 Digg This
 Find a programming school near you