Fireworks in Layers pg 3: Production Graphics with Wendy Peck at webreference.com
 |
Fireworks in Layers: Working with Layers | |
|
In the top image, the "background shapes" layer is locked. Note the lock icon with the layer. The bottom image shows all layers unlocked. |
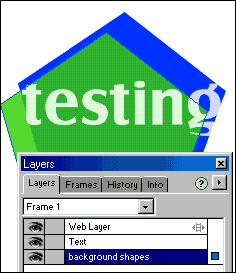
Lock them up To lock a layer, simply click in the gray square next to the layer name in the Layers palette. A lock icon will appear, signifying that the layer is locked. Click again to unlock. You can also lock every layer. This can be handy when you would like to lock all but one layer in document with many layers. Choose Lock All from the fly-out menu in the Layers palette and then unlock the one you would like to edit. To release all the layers, simply choose Unlock All from the same fly-out menu. If you have been working along with the discussion, or are a regular user, you will probably have noticed that you do not have to select a layer in the Layers palette in order to move an object. Unlike a raster program, a Fireworks layer automatically activates when you click on an object from that layer. In the image at the left, note how the "background shapes" layer is now active. The layer was activated when I selected the green polygon. This can be a terrific time saver, but it can be an irritant, too. When you are working with objects that are placed close together, or overlapped, it can take a couple of tries to get the right object selected. Although Fireworks does have a unique preselection almost like a mouseover to show you where you are, those tight areas can still make you crazy. If you would prefer that Fireworks layers behave like raster layers, where the layer must be active before you can edit the layer, you have that choice as well. Select Single Layer Editing from the Layers palette fly-out menu. As long as that feature is active, only objects on the active layer may be selected or edited. You can toggle this feature on and off. |
|
|
|
Visibility I use this feature when I am working on a busy background, or a color that is hard on the eyes, or even when the image I am working on has low contrast. Make the background invisible. Then add a layer, drawing a rectangle in a plain color with good contrast. Lock that layer and complete your tasks with the other objects. To restore, unlock and delete the temporary colored layer, then activate the original background visibility. In the image at the left, kerning this text could be a challenge, especially after you have been working with the image for a while. However, if you turn off the visibility of the background layer, or Layer 1, see how the text pops out. Do your editing and then click the visibility back on. You do not have to worry that the image will not be placed in exactly the right place as you would if you just moved it out of the way. It is still there, in exactly the same place. If you are not turning layer visibility on and off as you work, you
are probably missing some valuable opportunities to speed your work
and improve quality. You are also being kind to your eyes ... one of
your most valuable assets (even more valuable than RAM). |
|
|
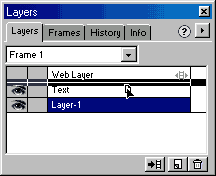
Click and drag to move a layer. The thick black line indicates where the layer will be dropped. |
Changing layer position You will often find that you have your layers in the wrong order, since objects on layers will cover those on layers below. Nothing could be easier to fix. Simply drag the layer to the correct position and drop it. See the image at the left which shows a Layer 1 hovering above Text, just waiting to be dropped. The thick black line indicates where the layer will be placed. And that's it!! |
|
|
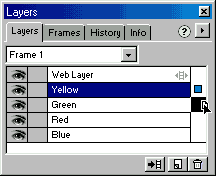
Clicking and dragging on the blue square at the right of the Layers window moves any selected objects from one layer to another. The larger black square indicates where the objects will be dropped. Clicking on the Alt or Option key, before you release the mouse, will place a copy of the object rather than just moving it. |
Moving objects between layers Let's face it, if you are using layers, you will be moving objects to a different place. You have several choices. The first is a simple cut or copy and paste. Select your object, then cut or copy. Make the destination layer active and paste. You can also move selected items from one layer to another in the Layers palette. Activate the layer containing the items you wish to move. Select the objects you wish to move. Click and drag the small blue rectangle to the layer where you would like the object(s) to go. Your object(s) will be moved to the new layer. If you prefer to copy objects from one layer to another, repeat as above, but press your Alt or Option key to create a copy. You will now have the same objects at exactly the same place on two different layers. Well, that is pretty well the full story of layers in Fireworks. Before you start screaming about missing features, like layer effects or transparency (how can you tell a raster fan every time?) read on to find out why we have no need for these in Fireworks. I also promised a special time-saver. Click to the next page and all will be revealed. |
|
|
|
Fireworks in Layers Tutorial IndexFireworks in Layers: No Frames Please |
URL: https://www.webreference.com/graphics/
Created: September 14, 2000
Revised: September 14, 2000


 Find a programming school near you