WebReference.com - Chapter 7 of XML for ASP.NET Developers, from Sams Publishing (11/13)
[previous] [next] |
XML for ASP.NET Developers
The XsltArgumentList Class
Earlier in the chapter, you saw how parameters could be used in XSLT style
sheets through the xsl:param element. As a quick refresher, this XSLT
element must have a name attribute and optional select
attribute:
<xsl:param name="customerID" select="'ALFKI'"/>XSLT parameters allow your ASP.NET applications to pass in values needed by
the style sheet to properly process the source XML document. In this section
you'll see how to create an XsltArgumentList class and add
parameter name/value pairs to it. It can also be used with extension objects.
Table 7.8 shows the different methods available on the XsltArgumentList
class (it has no properties).
Table 7.8 XsltArgumentList Methods
|
Method |
Description |
|
|
Allows an extension object to be added to the collection of extension
objects. The namespace URI can be used to remove or retrieve an object
from the collection using either |
|
|
Allows a parameter name/value pair to be added to the collection of
parameters. If you do not want to assign a namespaceURI, the URI can be
empty strings. It is similar to the |
|
|
Allows an extension object to be retrieved from the collection of extension
objects based on the namespaceURI assigned to the object in the |
|
|
Allows a parameter name/value pair to be retrieved from the collection of parameters based on a name and namespaceURI combination. If a parameter name has no assigned namespaceURI, the URI can be empty strings. |
|
|
Allows an extension object to be removed from the collection of extension
objects based on the namespaceURI assigned to the object in the |
|
|
Allows a parameter name/value pair to be removed from the collection of parameters based on a name and namespaceURI combination. If a parameter name has no assigned namespaceURI, the URI can be empty strings. |
The method that you'll use most frequently among those
listed in Table 7.8 is the AddParam() method. This method accepts the
name of the parameter, a namespace URI (optional), and the value of the
parameter. The following example shows how to add a parameter named
golferName to the XsltArgumentList collection:
XSLT Code:
<xsl:param name="golferName"/>ASP.NET Code:
XsltArgumentList args = new XsltArgumentList();
args.AddParam("golferName","","Dan");
This code allows the XSLT parameter named golferName to be assigned
a value of Dan. Although the value of Dan was hard-coded into
the AddParam() method, it could just as easily be dynamically pulled
from a text box or drop-down box, as you'll see in the next example.
Because the XsltArgumentList class relies on the HashTable
class behind the scenes, multiple parameter name/value pairs can be added and
stored.
After an XsltArgumentList class has been instantiated and filled
with the proper name/value pairs, how do the parameters in the XSLT style sheet
get updated with the proper values? The answer is to pass the
XsltArgumentList into the XslTransform class's
Transform() method, as shown next:
//Create the XPathDocument object
XPathDocument doc = new XPathDocument(Server.MapPath("Listing7.1.xml"));
//Create the XslTransform object
XslTransform xslDoc = new XslTransform();
xslDoc.Load(Server.MapPath("Listing 7.4.xsl"));
//Create the XsltArgumentList object
XsltArgumentList args = new XsltArgumentList();
args.AddParam("golferName","","Dan");
//Perform the transformation - pass in the parameters in the XsltArgumentList
xslDoc.Transform(doc,args,Response.Output);
In the next section you'll be presented with an ASP.NET application that does this task.
Putting It All Together
You've now seen the main XSLT classes built in to the .NET framework.
In this section you'll see how these can be used to build a simple ASP.NET
application that allows a user to select a specific golfer's information
from an XML document. After the golfer is chosen, XSLT will be used along with
the XPathDocument, XslTransform, and XsltArgumentList
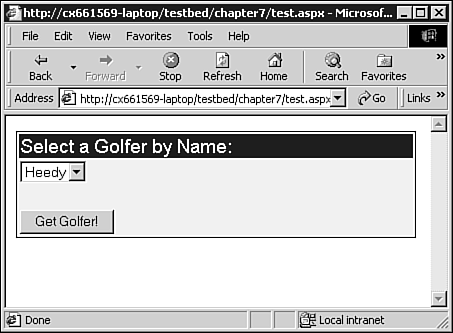
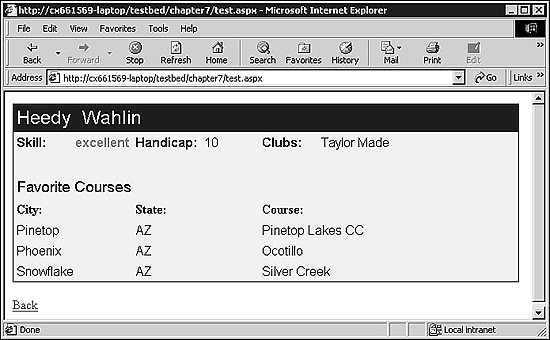
classes to display the golfer's information. Figures
7.4 and 7.5 show screen shots of the two pages involved in the sample XSLT application.

Figure 7.4: The golfer selection form

Figure 7.5: The XSLT-generated results of the golfer selection
To build this application, code-behind techniques were used in the ASP.NET page. If you're not familiar with this mechanism in ASP.NET coding, it allows the actual program code to be stored separately from the visual portion (the HTML) found in the ASP.NET page. The technique of placing all the code (programming code and HTML) into one ASP.NET page shown in many places throughout the book was used simply to make listings easier to read and follow. In practice, however, it's highly recommended that you leverage code-behind techniques to keep your ASP.NET code more maintainable.
For this example, a file named xsltGolfer.aspx.cs contains all the
programming code for the listings that follow, and xsltGolfer.aspx
contains the HTML. The XSLT style sheet used for the application is named
xsltGolfer.xsl. Let's start by examining what code is executed
when the ASP.NET page first loads (the Page_Load event). As you'll
see in Listing 7.10, this code takes care of loading all the firstName
element values found in the XML document into a drop-down box.
Listing 7.10 The Page_Load Event and FillDropDown() Method
(xsltGolfer.aspx.cs)
 1: private void Page_Load(object sender, System.EventArgs e) {
 2:   if (!Page.IsPostBack) {
 3:     FillDropDown("firstName");
 4:   }
 5: }
 6:
 7: private void FillDropDown(string element) {
 8:   string name = "";
 9:   this.ddGolferName.Items.Clear();
10:   XmlTextReader reader = new XmlTextReader(xmlPath);
11:   object firstNameObj = reader.NameTable.Add("firstName");
12:   while (reader.Read()) {
13:     if (reader.Name.Equals(firstNameObj)) {
14:       name = reader.ReadString();
15:       ListItem item = new ListItem(name,name);
16:       this.ddGolferName.Items.Add(item);
17:     }
18:   }
19:   reader.Close();
20: }
You can see that the XmlTextReader and XmlNameTable classes
are used to efficiently parse the XML data and add it to the drop-down box
(ddGolferName). Both classes were discussed in Chapter 5, "Using
the XmlTextReader and XmlTextWriter Classes in
ASP.NET."
After the user selects a specific golfer from the drop-down box and clicks
the button, the btnSubmit_Click event is fired. The code within this
event takes care of getting the selected golfer name value from the drop-down
box and passes it into the XSLT style sheet by using the XsltArgumentList
class. The style sheet then takes care of transforming the selected golfer's
XML data into HTML, as shown earlier in Figure 7.5. Listing 7.11 shows the code
involved in this process.
Listing 7.11 Transforming XML to HTML Using XSLT
(xsltGolfer.aspx.cs)
 1: protected void btnSubmit_Click(object sender, System.EventArgs e) {
 2:   string xslPath = Server.MapPath("xsltGolfer.xsl");
 3:   XmlTextReader xmlReader = null;
 4:   StringBuilder sb = new StringBuilder();
 5:   StringWriter sw = new StringWriter(sb);
 6:
 7:   try {
 8:     xmlReader = new XmlTextReader(xmlPath);
 9:     //Instantiate the XPathDocument Class
10:     XPathDocument doc = new XPathDocument(xmlReader);
11:
12:     //Instantiate the XslTransform Classes
13:     XslTransform transform = new XslTransform();
14:     transform.Load(xslPath);
15:
16:     //Add Parameters
17:     XsltArgumentList args = new XsltArgumentList();
18:     args.AddParam("golferName","",
19:            this.ddGolferName.SelectedItem.Value);
20:
21:     //Call Transform() method
22:     transform.Transform(doc, args, sw);
23:
24:     //Hide-Show ASP.NET Panels in xsltGolfer.aspx
25:     this.pnlSelectGolfer.Visible = false;
26:     this.pnlTransformation.Visible = true;
27:     this.divTransformation.InnerHtml = sb.ToString();
28:   }
29:   catch (Exception excp) {
30:     Response.Write(excp.ToString());
31:   }
32:   finally {
33:     xmlReader.Close();
34:     sw.Close();
35:   }
36: }
Although this doesn't show much in the way of new classes, it does show how the different classes discussed in earlier sections can be tied together to create an ASP.NET application that leverages XML and XSLT.
[previous] [next] |
© Copyright Pearson Education and
Created: April 22, 2002
Revised: April 22, 2002
URL: https://webreference.com/authoring/languages/xml/aspnet/chap7/11.html


 Find a programming school near you