3D Animation Workshop: Lesson 26: Animation Tools--MAX vs. Lightwave | 2
|
|
Lesson 26 - Animation Tools--MAX vs. Lightwave - Part 3
I think that most people would agree that Lightwave is generally stronger than MAX in modeling and weaker in animation. This statement however, requires some clarification.
Lightwave does not have the integrated modeling-animation environment that MAX has. Such an environment obviously strengthens animation by making modeling changes animatable. This advantage will clearly become more pronounced in MAX 2. MAX also provides for much more powerful animation of surface materials (color changes, etc.) than Lightwave offers.
Beginning animators love moving objects around on the screen to set keyframes, and this is undoubtedly exciting. But the moment one gains any experience at all, one comes to rely heavily on the animation graphing tools provided by the application. MAX's graphs are very powerful and complete. This advantage is, conversely, their disadvantage. It takes a lot of experience and determination to master these tools.
Lightwave's motion graphs are remarkably easy to use, which is no small advantage in learning something as difficult as animation. But they have important limitations. The graphs of only a single object can be viewed at any one time, and there are no filtering tools (as MAX has) for selecting only the very curves one wants to see. The biggest difference between the two programs, however, is the absence in Lightwave of Bezier curves for animation control.
Anyone with experience in traditional 2D computer graphics is undoubtedly familiar with Bezier curves and the manipulation of their tangent "handles." We noted in the last lesson that Lightwave lacks Bezier curves ("Bezier splines") for modeling geometry. This was less important than it might have been because of the power of metanurb modeling. But in animation, Bezier handles are critical in shaping motion.
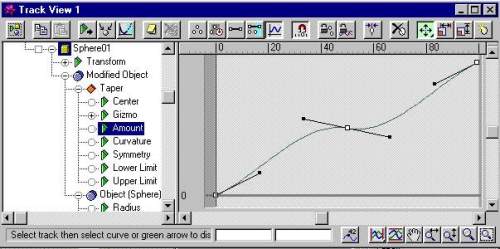
Examine the following "Track View" graph interface from MAX.

Notice that the parameter being animated here is the "amount" of the taper modifier object as applied to the sphere we've been using thus far. This "amount" is essentially the shape of the box as we have seen. There are three keyframes, points in time in which the value corresponding to this shape has been fixed.
Notice how the curve moves through and between these points. Without Bezier handles, our control over the shape of the curve between the keyframes would be rather limited. We could essentially change the grade or slope, but little more. With the Bezier handles, however, our control is rather considerable.
The motion through the middle key is most instructive. By tilting the Bezier handles we actually cause the motion to flow backwards in a dip before it flows forward again. In the case of our taper parameter, this means that the sphere is gradually being squeezed over the life of the animation, but takes a little "breath" in the middle.
Without the Bezier control, this effect would have required adding at least another keyframe (and probably more) to force the curve to follow the snaking path. But the Bezier handles make experimentation with timing and motion easy and interactive, and experimentation is everything in animation. I'm a big Lightwave fan, but it's foolish to discount the importance of Bezier control of motion curves as implemented in MAX. I would be very surprised not to find them implemented in the next version of Lightwave.
| To Return to Parts 1 and 2, Use Arrow Buttons |
|
Created: October 28, 1997
Revised: October 28, 1997
URL: https://webreference.com/3d/lesson26/part3.html


 Find a programming school near you