3D Animation Workshop: Lesson 26: Animation Tools--MAX vs. Lightwave
|
|
Lesson 26 - Animation Tools--MAX vs. Lightwave - Part 2
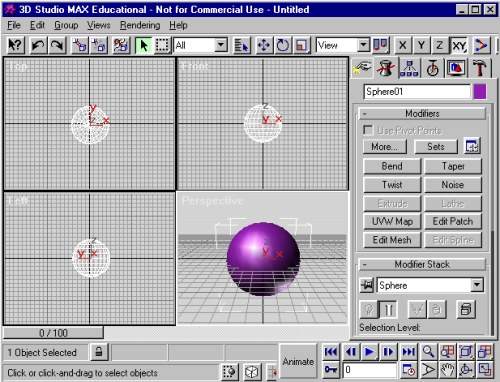
Here is a typical screen shot of the MAX interface

Note how much more the MAX interface relies on icons than does Lightwave. This presents a problem to the newcomer who must learn the meanings of the many tiny symbols (and this condensed screen shot shows less than the full number), but the situation is no accident. Unlike Lightwave, MAX has only a single interface and thus (at least) twice as many tools must somehow be crammed onto the working space of the screen. In MAX, modeling and animating are integrated. A single MAX file generated from this interface contains all the information that is spread between model and scene files in Lightwave.
At a minimum, this integration of modeling and animation can be seen as a convenience. If you need another object for a scene, you don't have to switch to the modeling program to create it. But this advantage, by itself, would not be very important. The real significance of the integrated environment is the ability to animate modeling changes in an object.
Animating the geometry of objects is often called morphing, and it can be achieved in a number of different ways. The oldest method is simply to create multiple edited copies of a single model and "morph" between them in an animation program. These multiple copies are typically called "morph targets." For example, a character's head could be modeled with the mouth open and closed. The two versions of the model are used as morph targets such that the mouth can be fully animated to open and close, or even to stop at any stage in between. Morph targeting is still much used, and new tools in both Lightwave and MAX are continuing to improve this methodology.
By its very nature, however, MAX permits a much more considerable use of morphing concepts than does Lightwave. Instead of having to create multiple models as morph targets, the MAX user can simply assign keyframes to the same model in different edited states. This is the direct result the integration of modeling into an animation environment and, by the way, is the very theme of Softimage.
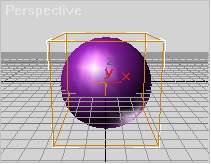
It's no surprise, therefore, that MAX's long list of modeling modifiers are all designed with animation possibilities in mind. This can cause no small confusion for the beginner because the modifier itself becomes an animatable "object" in conjunction with the model itself. The concept is undoubtedly subtle and not very intuitive, but it is definitely powerful. To give a taste in the simplest form, consider the sphere from the screen shot above with a "taper" modifier applied. The modifier, conceived of as an "object," appears first as a box around the sphere.

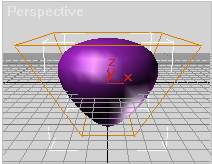
Changing the parameters of the modifier "object" necessarily morphs the geometry of the sphere, as follows:

By setting keyframes for changes in this parameter we can animate a "breathing" sphere, which I'll leave to your imagination.
We can certainly taper the geometry of a sphere in Lightwave Modeler, and in the latest 5.5 version, we can even keyframe tapers directly in Lightwave Layout. This development was a competitive concession to the power of this process in MAX. But the concept in MAX is much deeper and more general. In MAX we are not animating changes to the geometry of the model directly, but rather keyframing changes to the parameters of the modifier "object." It takes a while to grasp both what this means and how powerful the concept is. It's enough for the present to note that multiple modifier objects, added to the modifier stack, can all be animated separately for a combined effect on the underlying object.
So is Lightwave running behind on animation power?
| To Continue to Part 3, or Return to Part 1, Use Arrow Buttons |
|
Created: October 28, 1997
Revised: October 28, 1997
URL: https://webreference.com/3d/lesson26/part2.html


 Find a programming school near you